Photo credit: http://bit.ly/1li0QG4 CC licensed.
In this first topic we begin with a broad overview of sound in general and move to what you do on your instrument, looking at some of the mechanics of how and why. We need to begin with the everyday, to set a context before moving to the specifics of music and making music on your instrument.
Sounds are everywhere, and yet somehow they often go unnoticed as we are so visually oriented. You might begin to become aware of what sounds are around you as you read this – nearby traffic, typing sounds, inside sounds, outside sounds, people sounds, electricity sounds, humming, buzzing, even slurping coffee sounds and if you’re like me, you’ll also have some level of background sound constantly in your ears – tinnitus.  The moment we consider being aware, is like removing a dustsheet or turning on a light and suddenly you can see things differently. As a musician and someone considering teaching, it is important to dissect this awareness of sound and how it is perceived in the space around us so you can a) understand it better in your own mind, and b) gain a perspective that will inform your teaching. What is the difference between focusing through your eyes as opposed to your ears? How is one sense affected when you use the other? Can you shut off? Do you need to?
Photo credit: http://bit.ly/VT3shz CC licensed.
Task 1.1: Explore your own experience of perception while digesting these resources – listen and see. The first is a radio programme called Aural Architecture that was broadcast on the BBC World Service Discovery, on April 29, 2009 and the second is Chapter 2 From ‘Spaces Speak, Are You Listening: Exploring Aural Architecture’, by Barry Blesser and Linda-Ruth Salter. © MIT Press 2007. How are the two experiences different? Is one more natural or easier for you?
- Aural Architecture
- You can read a large chunk of the chapter on GoogleBooks here.
Sound as an experience is important, because it can be the starting point for a music student’s everyday experience, and the base of their aural learning. As a musician and teacher this has implications for your own performance as well as how you listen, communicate, and explain. Listening is a skill, and just as people may say someone has developed ‘an eye for detail’, being able to hone in listening is a valuable skill that can be developed and refined throughout learning.
Task 1.2: Capture your experience of the surface of sound around you. Choose a place and create a soundscape using your phone or another recording device. Before you make your recording, take a photo or video of the place and take time to really be aware of what you are recording and how the sounds are woven or collide to form that canvas. Write a full description of the place, including photos or videos if possible, and list all the sounds you have captured – do this right away so you have everything fresh in your mind.
Post the recording online and tag it with #MUS654 so people can then find it and have a listen. The idea is that we listen to each other’s recordings and see what we notice- first impressions, details. Link the description to the post. Embed the link so people do not see the photos/video and read your description before they listen, but they only hear and can then comment ‘blind’. The really interesting thing is to see what people pick out, what they miss (or mistake for different things), and if they perceive enough to paint a picture of the place.
How do we perceive sounds? Here’s some further reading if you’d like to dig deep. This article on “The Neural Basis of Individual Holistic and Spectral Sound Perception” (whew!) was shared with me by Matthias Melcher. (Many thanks!)
Listening within the sound
With music there is an art of listening, and it is a challenge to listen with your ears as if they were your eyes and your fingers. Sounds are complex and have texture, depth, movement, and specific signatures that identify the instrument or source and that stand out as elements or qualities that are particularly pleasing or sought after. Inside musical sounds there is a complex spectrum of harmonics, and although these are present, we don’t always hear them and certainly don’t always listen to them. The best way to explain and demonstrate this is not through words, but by hearing it. Jump straight in and listen to these two short videos. Reflect on how you listen, what you hear, and how this impacts how you thought you understood your own voice. Amazing Grace with overtones:
And here’s a tutorial on how to do it:
maybe you could even give a concert singing songs like that… she did:
Harmonics and instruments
What is the difference between your voice and an oboe? Lots. What about the reason the sound is different? Each instrument has its own harmonic envelope, with its signature pattern of harmonics drawn from the same harmonic series.
CC licensed
The differences between instruments can be understood with a simple analogy: we are all people, but our shape, size, eye colour, hair length are all different and unique to us. It is that way with instruments. The harmonic envelope, or shape formed by the strength of the different harmonics within the sound of a string instrument is different to that of an oboe or piano or voice, and this is partly how our ear is able to identify the instrument being played. There is a very clear explanation here about the makeup of musical sounds from the Physics department at the University of New South Wales in Australia that you can access here.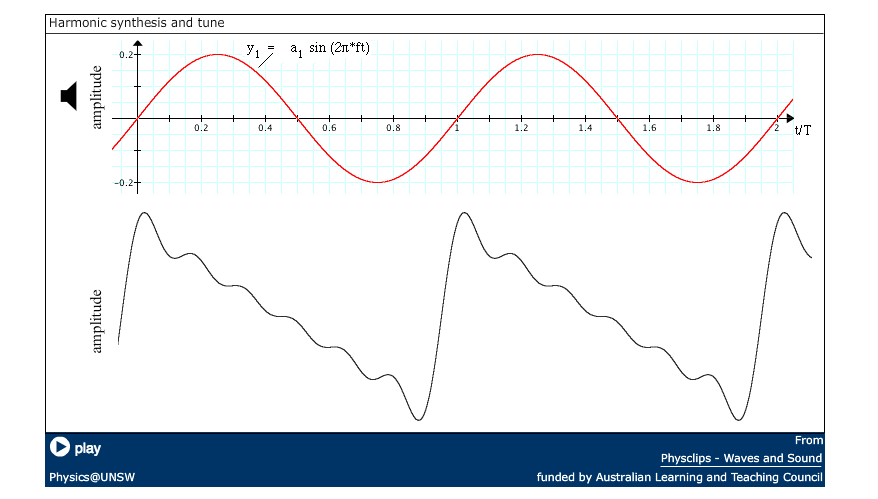
It comes complete with fun audio examples… There is one very important point that comes out of the first page of the link above, and that is the harmonic envelope does not completely define the sound. It is one of several components.
![]()
The sound. Bringing it back to your instrument:
It makes sense to move on to exploring the harmonics produced with your instrument. There are several programmes that will display the wave form of a musical sound. You can experiment with a free tuning app. N-track. With this app, you will see the complex shape formed by the composite of the harmonics within the sound and the spikes from strong harmonics. You can use this to see if you are able to sing those overtones and change the tuner’s perception of the fundamental (root of the) pitch.
VoceVista is a programme that was designed specifically for singers and to analyse the timbral content of the human voice. It shows you images like this: (taken from the programme homepage)

There is a free version of the programme here. (scroll down the page – or search- and look for Voce Vista)… looks like this:
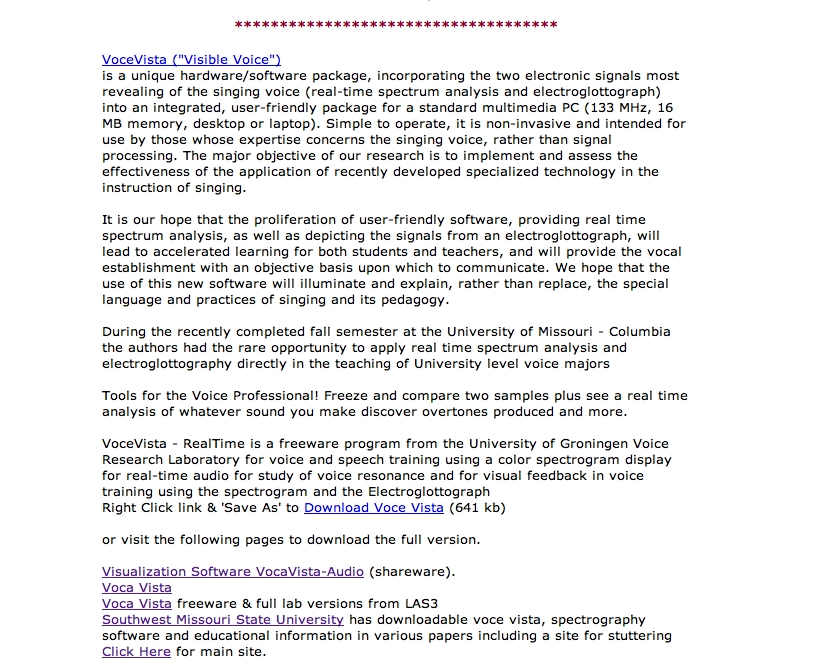
The programme downloads via the link at the bottom of the paragraphs.
This version is designed for a pc, but if you have a MAC, the programme can be converted to run with winebottle – another programme that’s free (instructions and links here. I did this on my machine – ran the youtube tutorial and only had to go about 4 min 30 into it… and it worked! As soon as the VoceVista icon appeared as a white square with music staff lines on it, then all was go!) Have an explore and play with the programmes and see what your sound looks like. Explore different musical sounds and compare the content. Can you change the strength of the harmonics? Have a go with that overtone singing… If you play your instrument in different ways are you able to subtly change the composition within the tone? Can you draw any conclusions as to what these changes mean? Do any specific alterations make the sound ‘better’ or more appealing? Post and tag your thoughts….
Physicality of playing:
How is the sound is sound physically produced? In your instrument what makes the vibrations? Air? A string? How is it amplified? Understanding the physical mechanics of your instrument can be slightly neurotic, and it is possible to go into microscopic, complex detail, but on a practical level having an understanding matters. This is an awesome video of a violin string in slow motion. Sadly there is no sound, but if there was, the beginning and ending of the sound would be shocking. That is no reflection on any performer, but a violin sound contains a lot of ‘noise’ as the bow begins to excite the string. Slow motion violin bow:
The physicality of playing instruments is more obvious with some instruments than others, but what people do not necessarily consider is how the instrument reacts to the creation of sound waves. Hitting the drums is dramatically illustrated here in super slow motion.
It is important to note that percussion instruments, including bells, sit outside sound production based on the standard harmonic series. Bells are complicated, they do have harmonics, but these do not follow the same pattern or relationship as other instruments have with the fundamental note they produce. You can read more on the Keltek Trust page here. Drums do have harmonics, but they follow Bessel functions (explanation here), which are mathematically complicated. There are some approachable visual representations on the wikepedia page that show the variety of ways in which a drum head can vibrate – as opposed to the vibrational signature of other instruments that is based on the harmonic series.
Now comes the link to pedagogy…
How does all this relate to creating a curriculum? If you are going to teach, you can simply copy what you already do and repeat that to a student, but that is not at all ideal, and to be adaptable and be able to relate to different people, it helps a lot to understand what it is you are talking about. Consider the body and the instrument and how both aspects work, separately– and then what happens when body and instrument come together. For vocalists the body is the instrument and that becomes extremely tricky as there is potentially a very complex aspect of psychology involved with actually being the instrument.
 Photo credit: http://bit.ly/1q8prxc CC licensed.
Task 1.3: Map out the physical movements that you need to make when playing your instrument. Have a look at the interactive skeleton programme called KineMan. Choose a joint from the drop down menu to get started – and don’t worry if you don’t know the medical name for an elbow or a shoulder, there are crosshairs on the drawing that show you which joint you have selected… also, DO have a read of the T&C, they point out that you are free to copy static images, but not to reproduce animations. Document this process with a few screen shots that show the different body parts and how they move, and reflect on what you as a practicing musician, were already aware of, and what you learned about the body and how it moves. These posts are all about process: how you figure it out and what it means to your music making.
Photo credit: http://bit.ly/1qkslOq CC licensed.
Challenges?
What are some of the challenges in producing sound for your instrument? Are there pitfalls to making a good sound? In string playing people say things like – relax, don’t press, less is more… Ok, those are clichés, but there are things that people try to do and make happen, and often we can physically get in our own way – or in the way of the vibrating sound waves we produce. I’m a cellist, and so here’s a cello example to get you started.
Talk 64: Paris Collection XII – Bow Changes from David Finckel and Wu Han on Vimeo.
In this video David Finckel talks about the bow change and some associated issues. He also makes nice references to specific body parts and the motion they make (you could go back to the KlineMan and try them out, and when you pinpoint the challenging areas with making free, uninhibited sound on your instrument, simulate the motion for those as well…). There is always controversy about technical issues, because we each have different bodies and there are so many variables, and a solution that works for one person might not be right for another, but there are some physical, physics-ical, and technical details that will make even the most sceptical people think about how and why they play a certain way. With this openness in mind, don’t be afraid to explore some of the complexities of sound production. Questioning is the first step to understanding, and if you as the teacher don’t think of it – will the student??
Task 1.4: Note at least three challenges to playing your instrument where it is possible to get in the way of sound production. Support these with pictures, sound recordings, or videos. And remember … tag it!
The sound
Task 1.5 To round off the week, consider that vision of the ideal sound that you have in your mind. If you do have a vision of sound then this will help you articulate it, and if you aren’t sure what ‘that sound’ is for you, then this exercise will guide you toward it. Get stuck into listening to performers on your instrument. Choose at least five distinct and different people. What different sounds are out there? What do you think of them and why? Write it up! Post about who you listened to listen to, what particular aspects of their sound attracted you and why. You don’t need to become a critic, but use this as a vehicle to highlight different examples of types of sounds within your instrument. There may be a specific moment in a recording , as opposed to the whole general sound, and it could even be the things that the listener doesn’t hear that attract you. There are no wrong answers here, just evidence of genuine thought and reflection. The process of listening and directing your attention has a lot to do with that initial soundscape you created… wonder if you would hear it differently now…
This week’s checklist:
- Read and listen to the resources about aural architecture
- Create a soundscape, post it, tag it, and remember to have your description and photo of the location linked to the post
- Explore the sounds you make on your instrument with VoceVista
- Think about physicality and how you play your instrument
- Map how to physically move the body to play the instrument. Document this with screen shots and a reflective commentary on how or if this affects your awareness as a musician.
- Three challenges to producing a free sound… with support from photos, videos, or sound recordings.
- The sound – listen to performers and hone what it is that you really like about each of their sounds.
So over the course of the week as you complete the tasks, post about them, tweet about them, and remember to tag them with #MUS654 so others can join in the conversation.
Pingback: LISTENING to sound - lauraritchie.com
Pingback: Broadening Horizons with #MUS654 - lauraritchie.com
Pingback: Listening to the world MUS654 - lauraritchie.com
Pingback: Time to open #MUS654 for 2017 - lauraritchie.com
Pingback: It's a physical thing - lauraritchie.com
Pingback: Sunday musings on listening - lauraritchie.com
Pingback: Sounds around: #MUS654 Day 3 - lauraritchie.com
Pingback: Day 1 #MUS654 2016 - lauraritchie.com
Just listened to Aural Architecture, really interesting 🙂 and yeah acoustics are hugely important in every situation, especially music, say playing in the Student Union that has pretty good acoustics when it comes to playing live loud rock music. But in the Octagon which is a totally different space playing the same music sounds kind of terrible ahah
Also interesting to think about what materials are best for different sounds to be produced, for example the type of woods used in guitars, acoustic guitars show this extremely well more than electrics, but the type of wood and the way it’s all put together can change the overall tone, sustain and general playing experience.
For example my Taylor acoustic (No electronics involved) vs my Yamaha (Uses a Pre-amp inside). My Taylor is made from Tropical mahogany on the top, and layered Sapele. The mahogany being very responsive to overtones, and will produce more fuller and richer sound once played in a bit. With layered Sapele this isn’t that great a wood to use because of it’s layers, but make for a much more solid build and weather proofing, since solid wood changes in different climates.
With my Yamaha electric acoustic is made from lamenate Spruce on the top and Nato back and sides, spruce bringing out the nice high tones and creating and nice sweet and smooth tone, with good projection and volume and nato doesn’t really offer much in the ways of tone, but is a cheap durable wood and replacement for mahogany.
Overall the Taylor with it’s more natural properties offer a way better sound and acoustic tone, this being that natural non laminated woods resonate better than laminate woods.